Using OBS with Zoom
Over the last few months I've been making lots of use of Zoom for our church meetings. We use a lot of video and sound in our meetings and rather than using Zoom Screen Share which is a bit clunky, you can use the excellent free software OBS to play video clips and sound into the Zoom meeting in a controlled way. In OBS you set up multiple "Scenes" which you select by clicking a button in a list, each Scene will play back a particular video or show a camera view or something.
People keep asking me how to do this so here it is...
1. Download and install OBS from https://obsproject.com/ (if you're on Windows and aren't sure whether to get 64 bit or 32 bit, the 32 bit will work on any type of Windows so get that)
2. Download and install VB-Audio Cable from https://vb-audio.com/Cable/index.htm
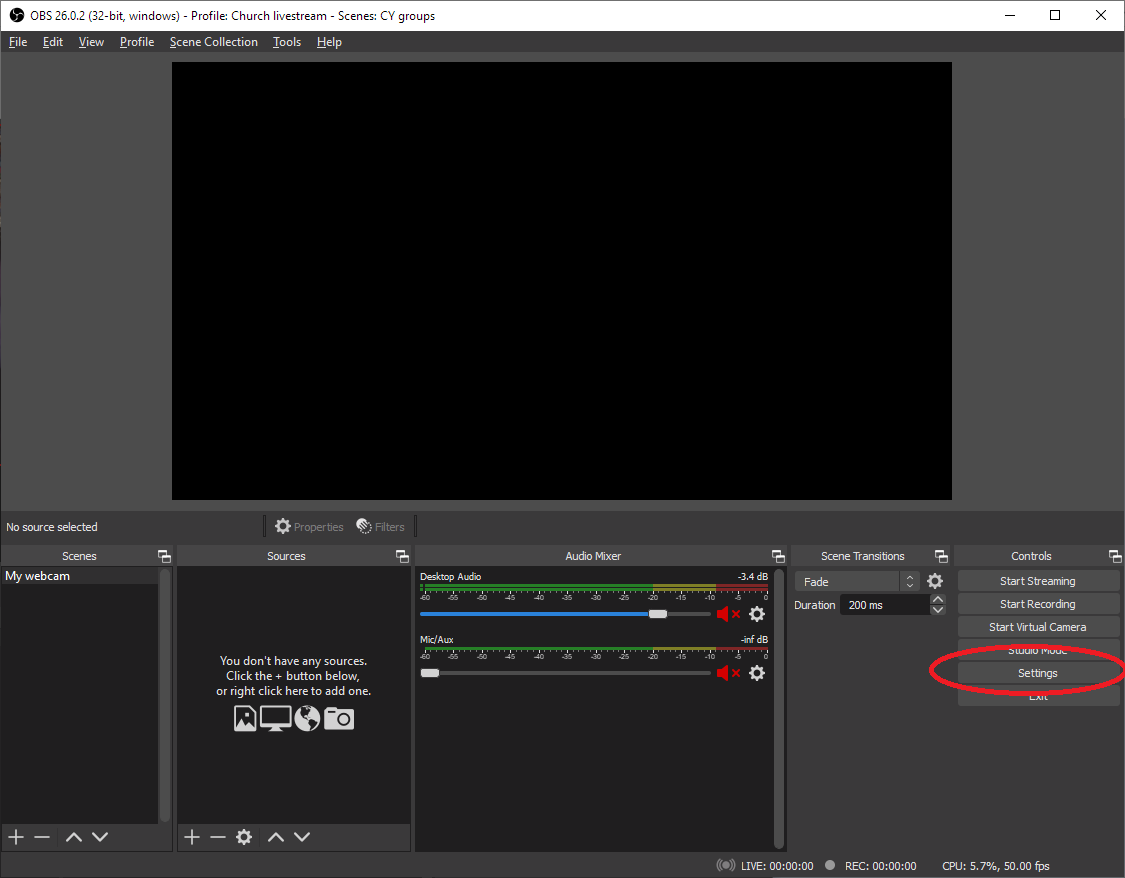
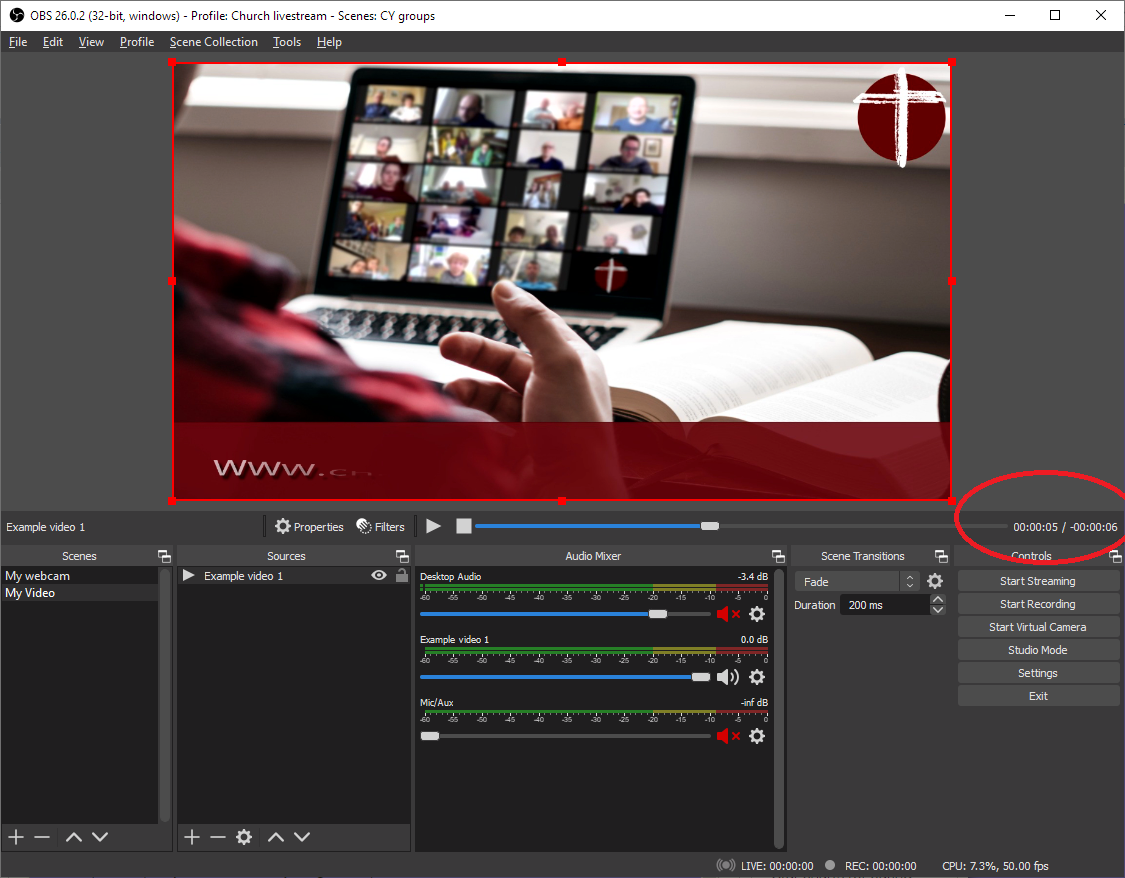
3. Run OBS. You should get a screen like this. Click the Settings button on the bottom right hand side.
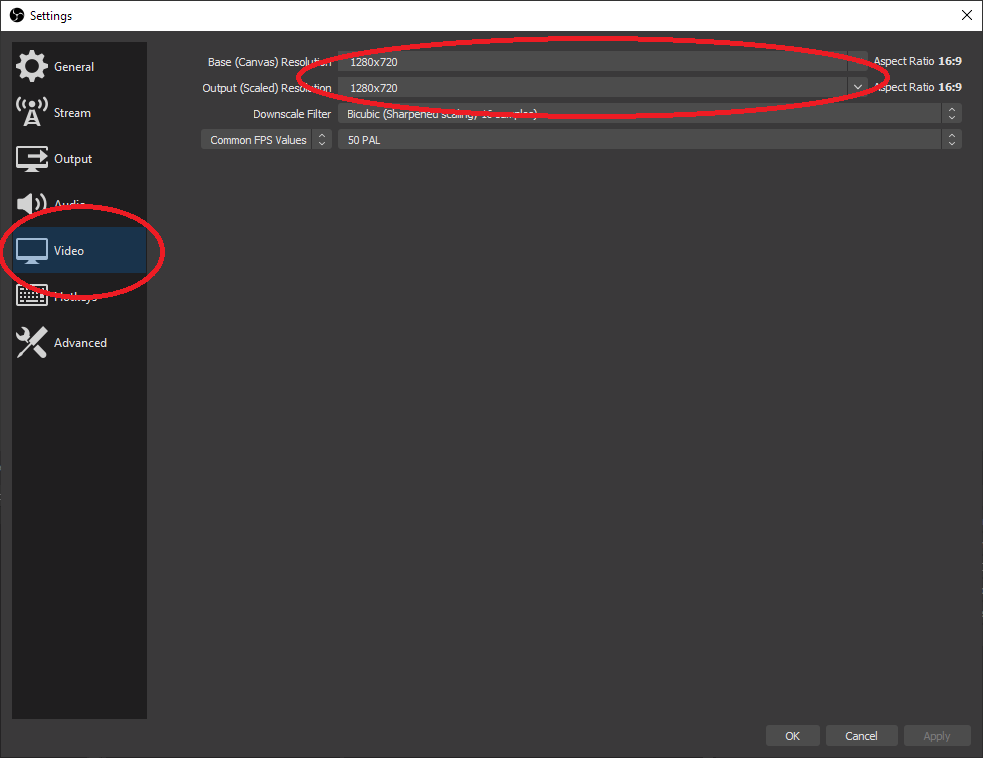
4. In the Settings window, click on Video and set the Base resolution and Output resolution to 1280 x 720. Click OK.
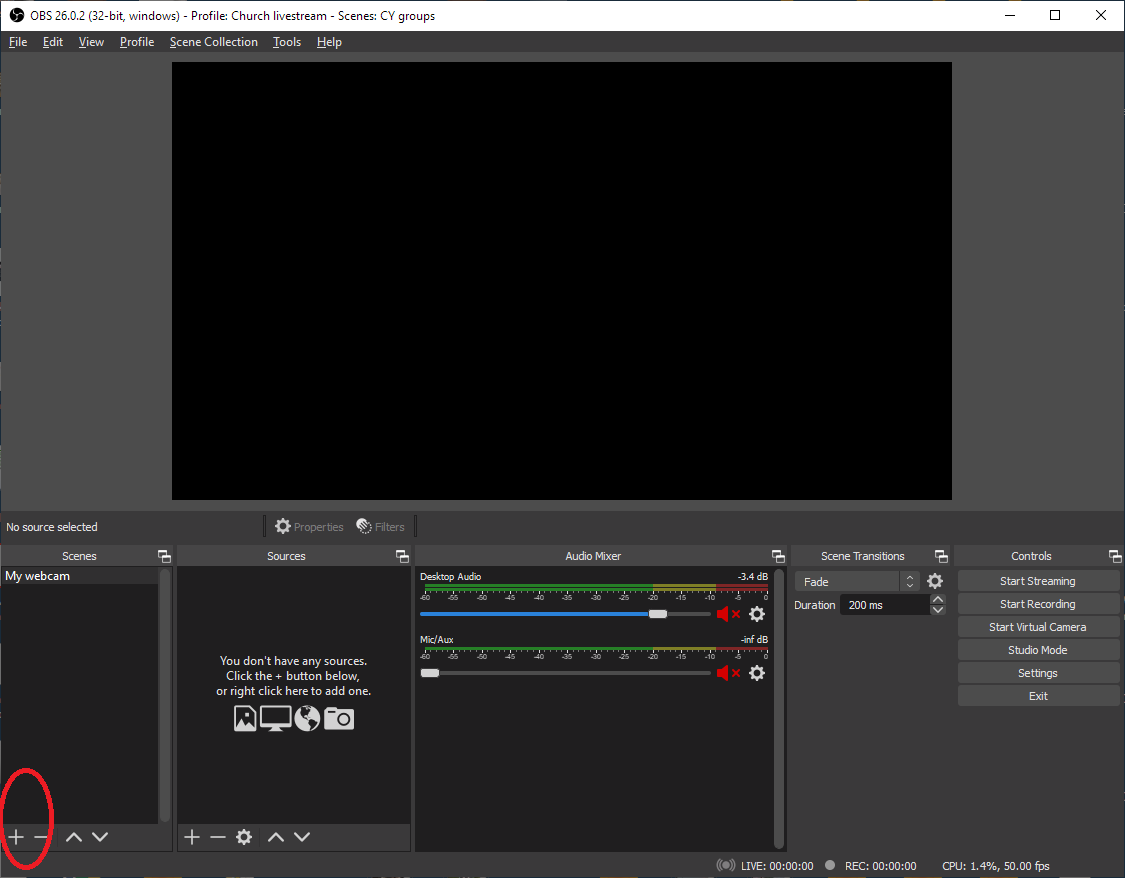
5. Click the "Plus" in the bottom left corner to add a scene
6. Enter a name for the new scene, e.g .My webcam, and click OK
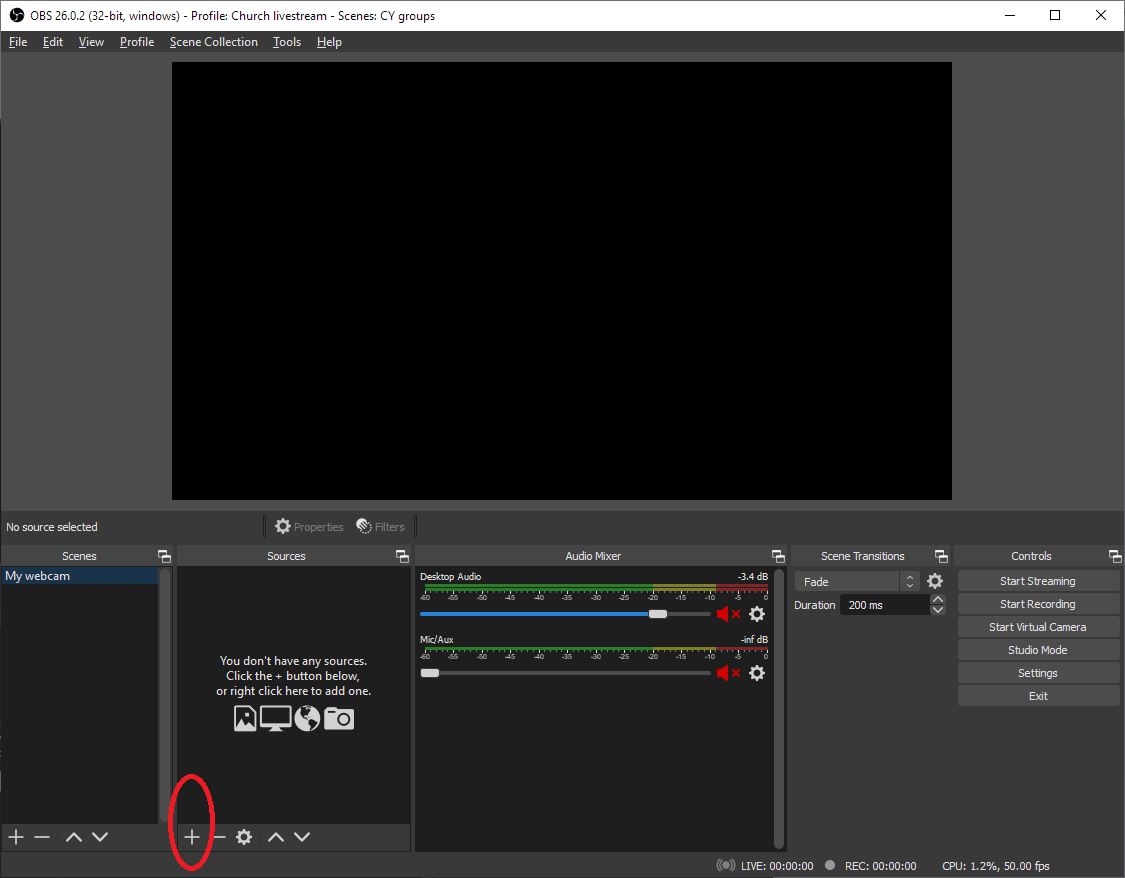
7. Now you need to add a "Source" to the scene. This tells OBS what to display when you select the scene in the left column. You can have multiple sources which overlay on each other but for now we'll just add a camera. Click the "Plus" in the second column (Sources)
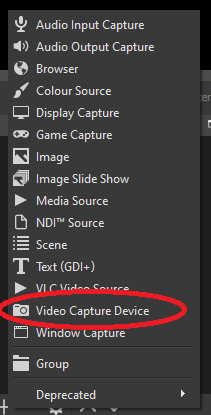
8. From the list that pops up, select "Video Capture Device"
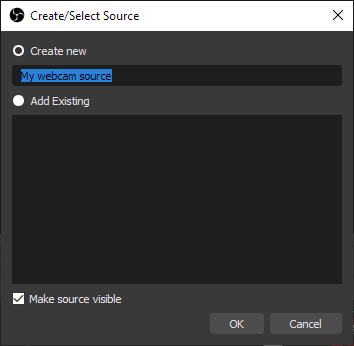
9. In the next window, "Create New" is already selected. Give the source a name so you know what it is later, this has to be different to all scene names so call it "My webcam source"
10. You then get another box that lets you choose different capture devices on the computer, if you have more than one camera connected. You will probably just have your webcam listed and "OBS Virtual Camera" (which we'll come to later). If your webcam is not in the list make sure you don't have any other program running which is already using it (e.g. Zoom). If you do, shut down the other program, and cancel out of this window, then go back to step 7.
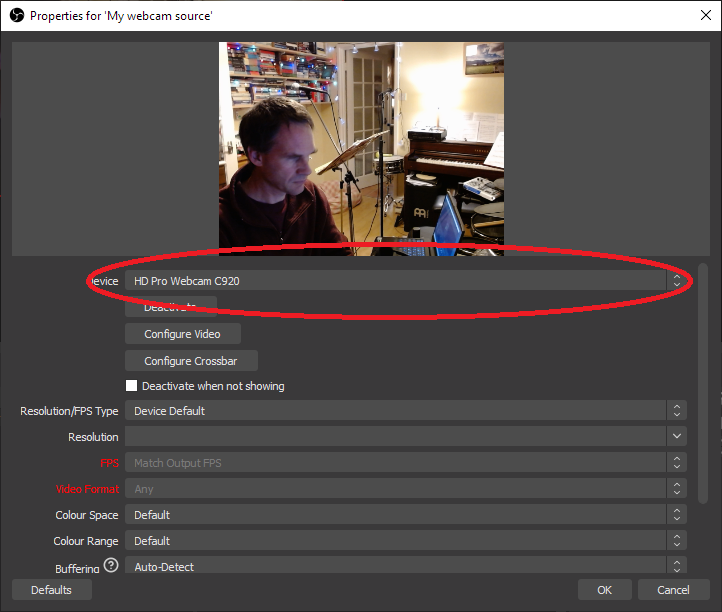
If you select your camera in "Device", then you should see the picture from it in the preview at the top.
9. In the "Resolution/FPS Type" dropdown select "Custom" - then in the Resolution list choose 1280x720 from the big list of resolutions available there. (If not available, just change the box above back from "Custom" to "Device Default".
Click OK!
10. Now you should be back on the main OBS window, and you should see your camera in the main window with a red box round it.
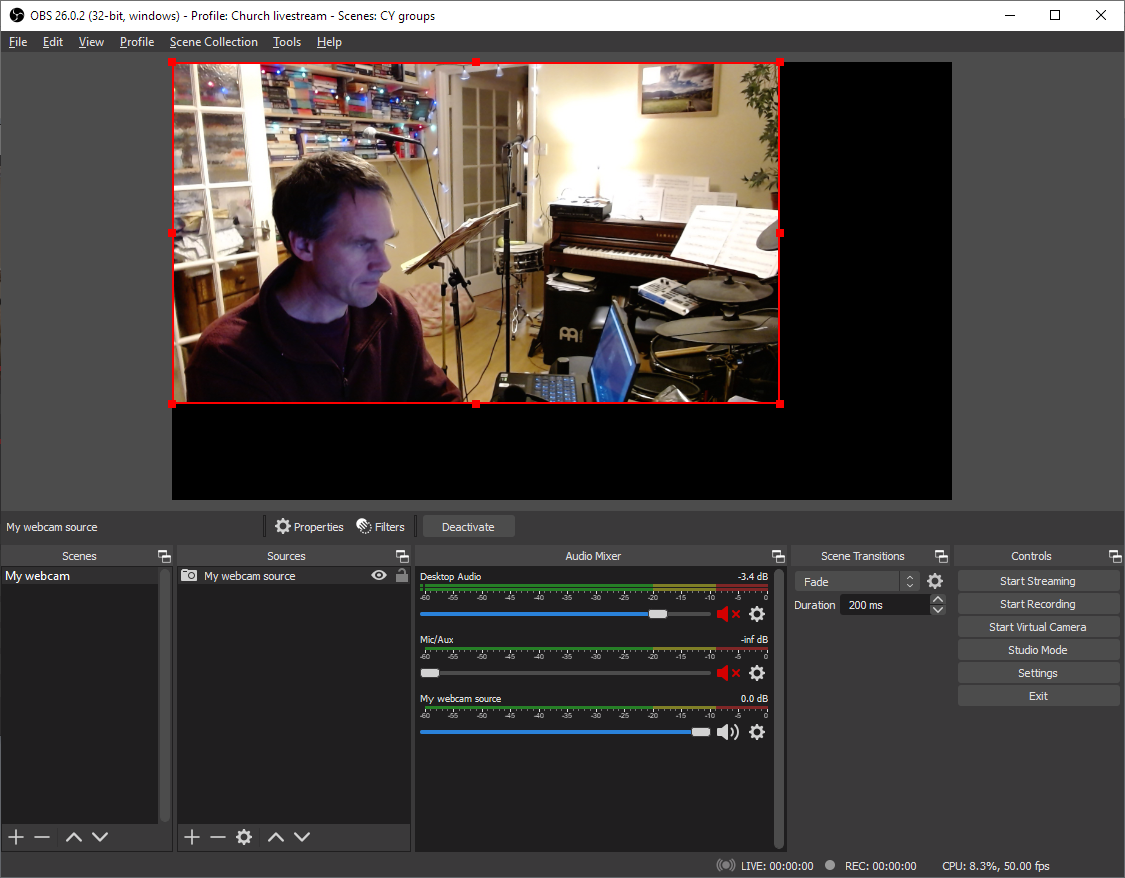
11. Click and drag on the corner of the window so the camera fills the screen (it might already).
Alternatively to set a source to fill the screen, you can right-click on the OBS picture and select Transform --> Fit to Screen from the menu.
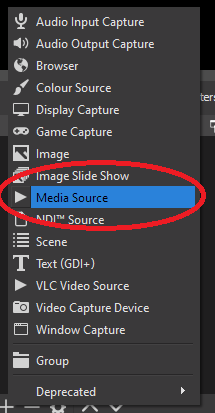
12. Now we will add a second Scene. For this you will need a sample video file that you can play back. Repeat steps 5-6-7 to add a new scene called "My video", but this time when you get to the sources menu, pick "Media Source"
Give it the name "Example video 1" or something.
13. You now get a new window where you can select a video file to play by clicking the Browse button.
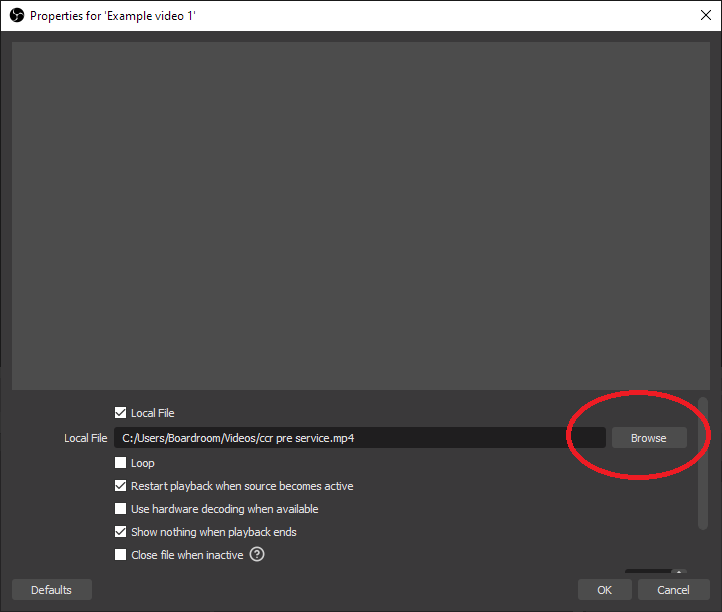
Pick a video file that you can play as an example. (To play a loop e.g. a holding intro slide, you can click the loop box. Normally the video will just play and stop showing a black screen.) Unlike the Video Capture input, you don't see anything in the preview box here.
14. Click OK, the video should now play in the OBS main window. Again you might need to resize it to fit the window using the red handles or the right click menu (Step 11)
While the video is playing, you get a play bar below the main window and at the right hand side it tells you how much video has played and how much is left to play (this is handy for knowing when it is about to finish)
You can show the Scenes as a list, but if you have more than a few scenes I prefer "Grid mode" where each scene is shown as a button to click - right click on the Scenes list and select "Grid Mode" to enable this.
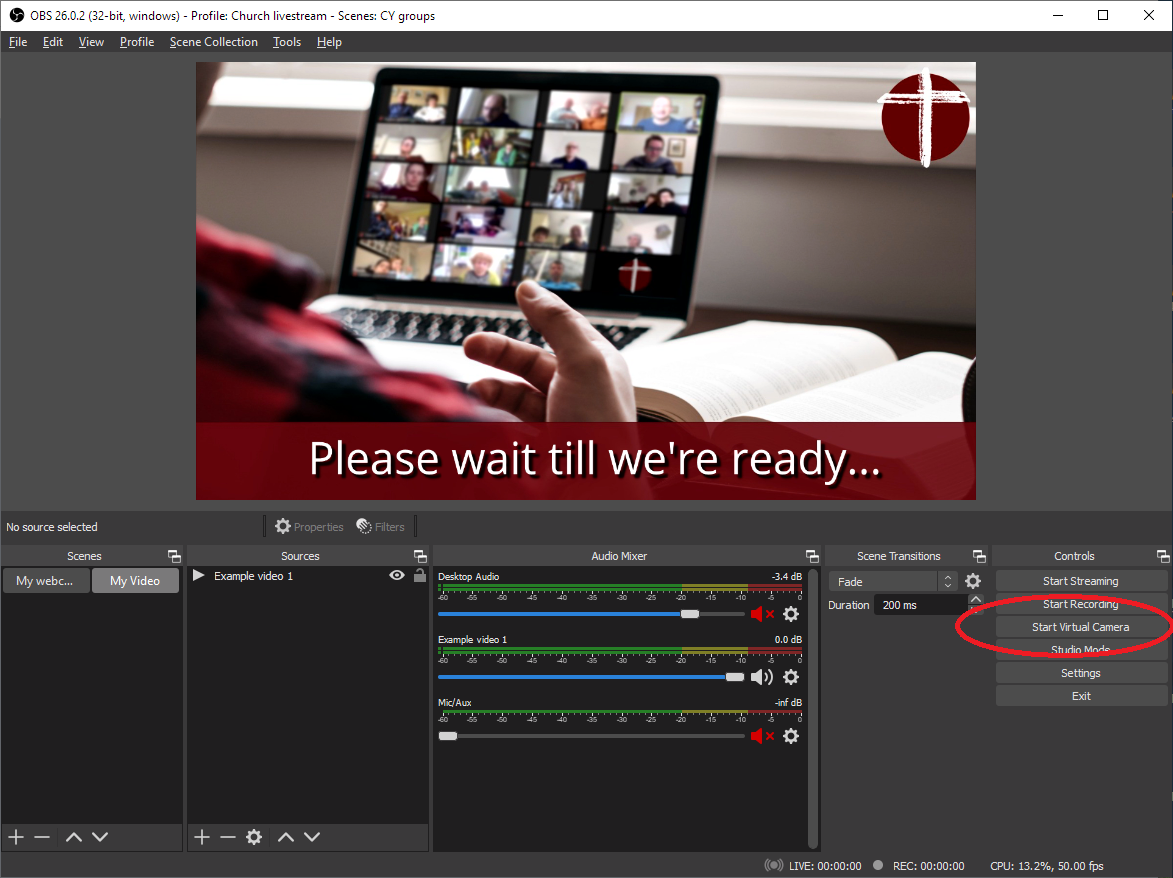
15. The video side of OBS is now set up. Click "Start Virtual Camera" on the bottom right to make the OBS output into a video source which Zoom will be able to see.
16. Before we go onto Zoom, you also need to set up the audio from OBS. Unfortunately the Virtual Camera only sends video, we need to set up the audio separately. This is where the VB-Audio software comes in that you installed earlier. It basically creates a virtual audio cable allowing you to feed the audio output of an application into the input of a different application.
Look at the audio bargraphs in the middle of the OBS screen. One of them should be called "Example video 1" (or whatever you called your video clip). Click the "Cog" icon at the right hand end of the audio bargraph and select "Advanced Audio Properties" from the bottom of the menu .
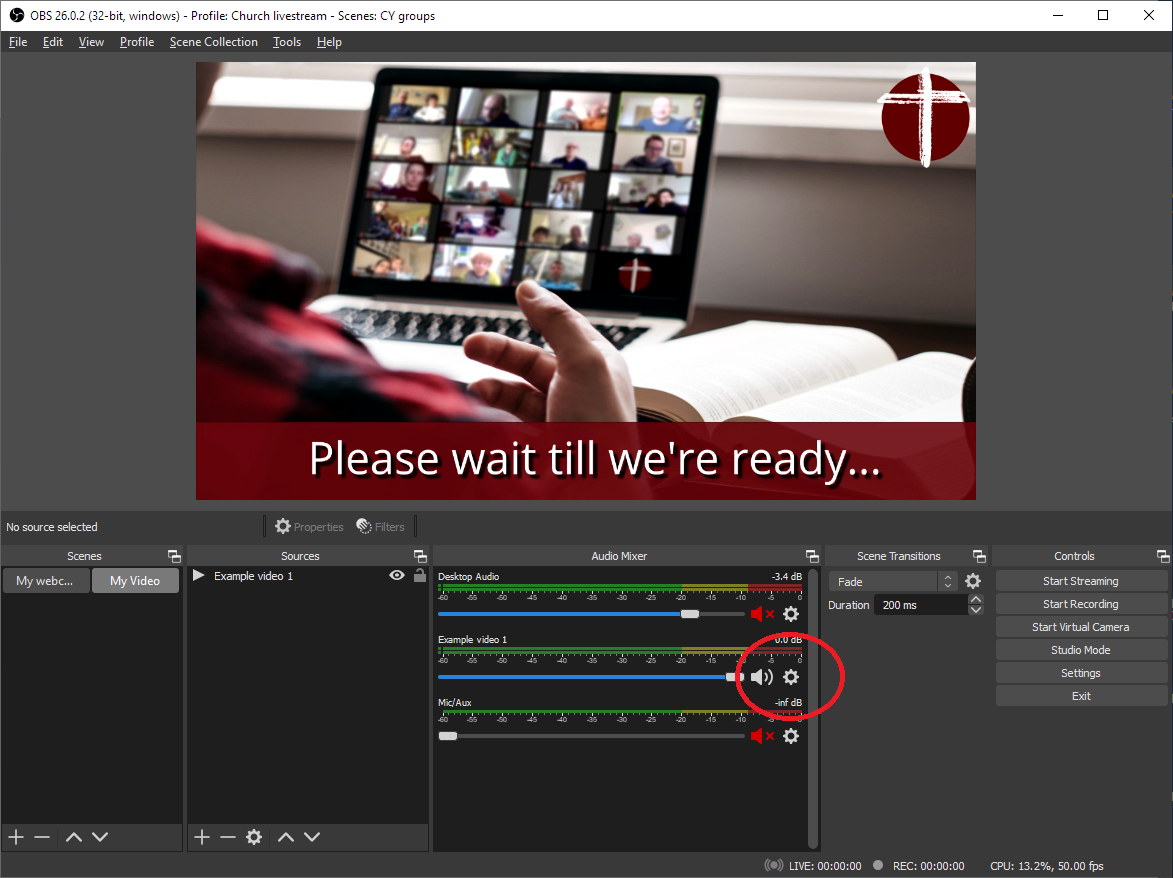
17. In the "Advanced Audio Properties" window, there is a row for each bargraph. Set the "Audio Monitoring" for your video source (see the name at the left hand side) to "Monitor and Output" and click Close.
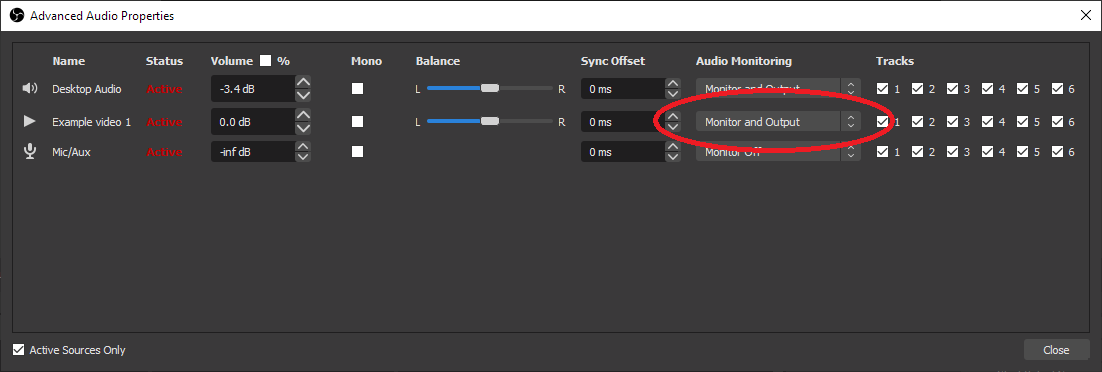
Important: You will need to do this for each Source that you want to be able to hear in Zoom. So also click on your Webcam scene, then click on the cog for "My Webcam Source" and set that to Monitor and Output. Zoom defaults to "Monitor Off" so you won't hear OBS sources in Zoom unless you set this option for each one.
18. Now go back into the OBS settings by clicking the button on the bottom right of the main screen (see Step 3) but this time go into the Audio settings and set Advanced - Monitoring Device to "CABLE input VB-Audio virtual cable"
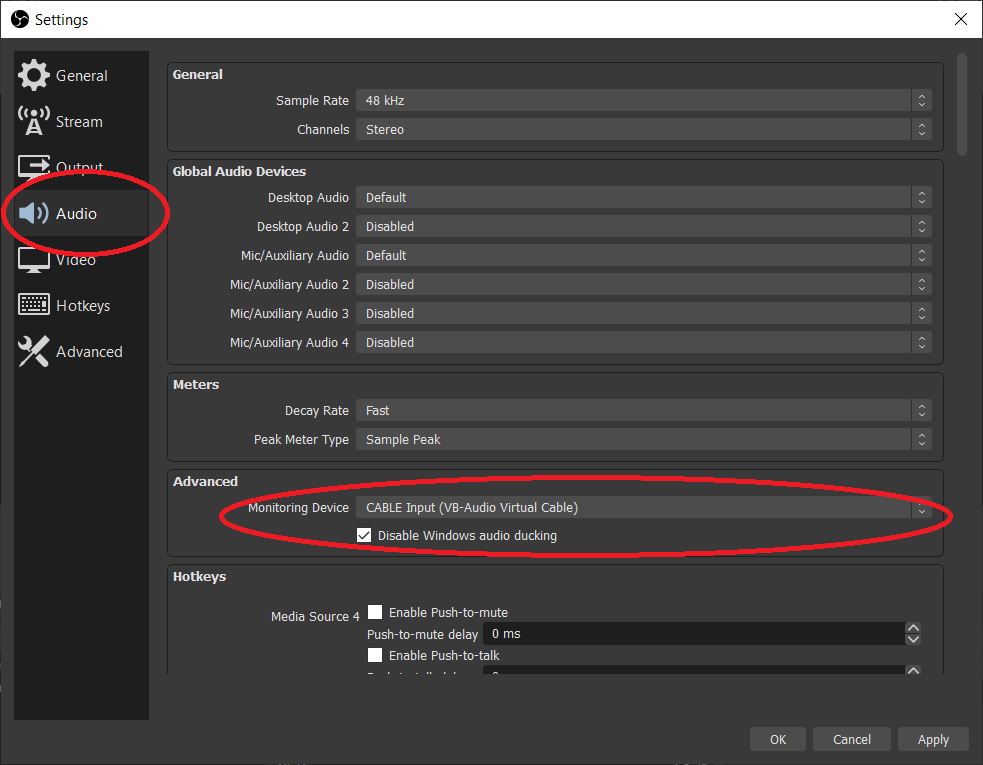
Click Apply then OK to exit the Settings window.
Right, that's OBS set up, now lets set up Zoom (this is a lot easier hopefully)
19. Start a Zoom meeting.
20. In Zoom, click on the little video source select arrow on the Video button.
21. On the Camera Select list that pops up, you should see OBS Virtual Camera, select it (if you haven't started the camera on OBS you will get an OBS logo on the Zoom screen).
22. In zoom you should now see whatever OBS is playing. If you click on your webcam scene in OBS, that's what should be seen in Zoom.
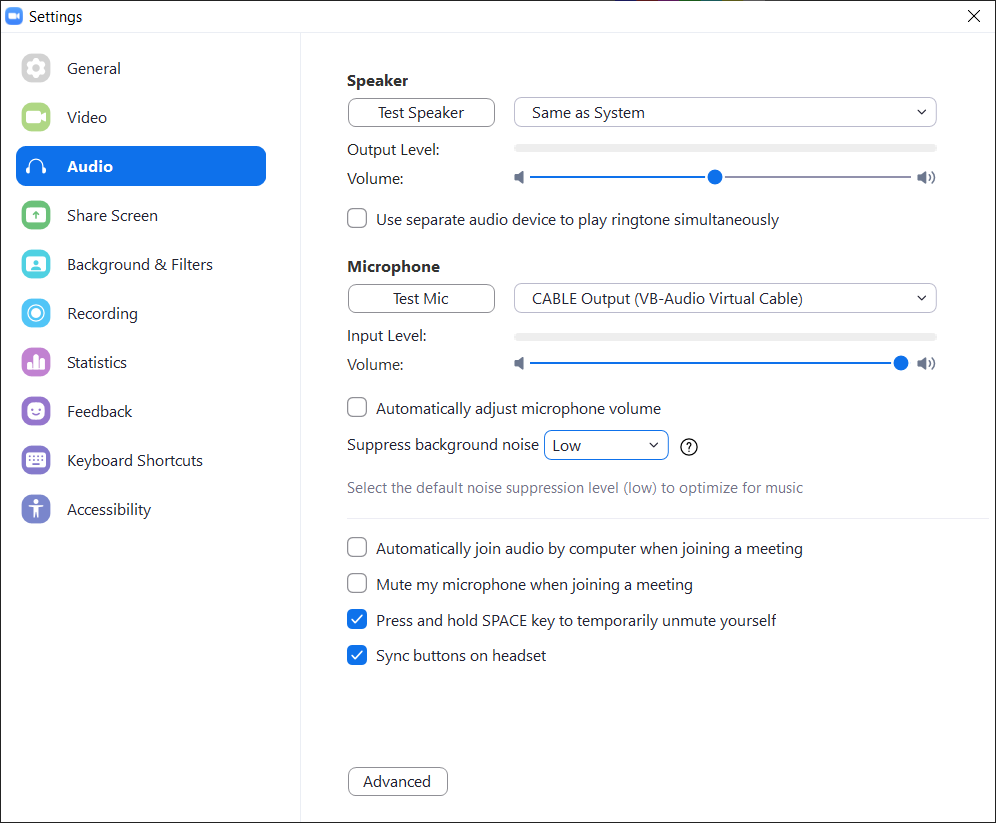
23. In Zoom, click on the little audio source select arrow and in the Microphone Select choose "CABLE output VB-Audio Virtual Cable". For the Speakers leave this set to "Speakers" or "Same as System" so you can hear what other people on the zoom call are saying.
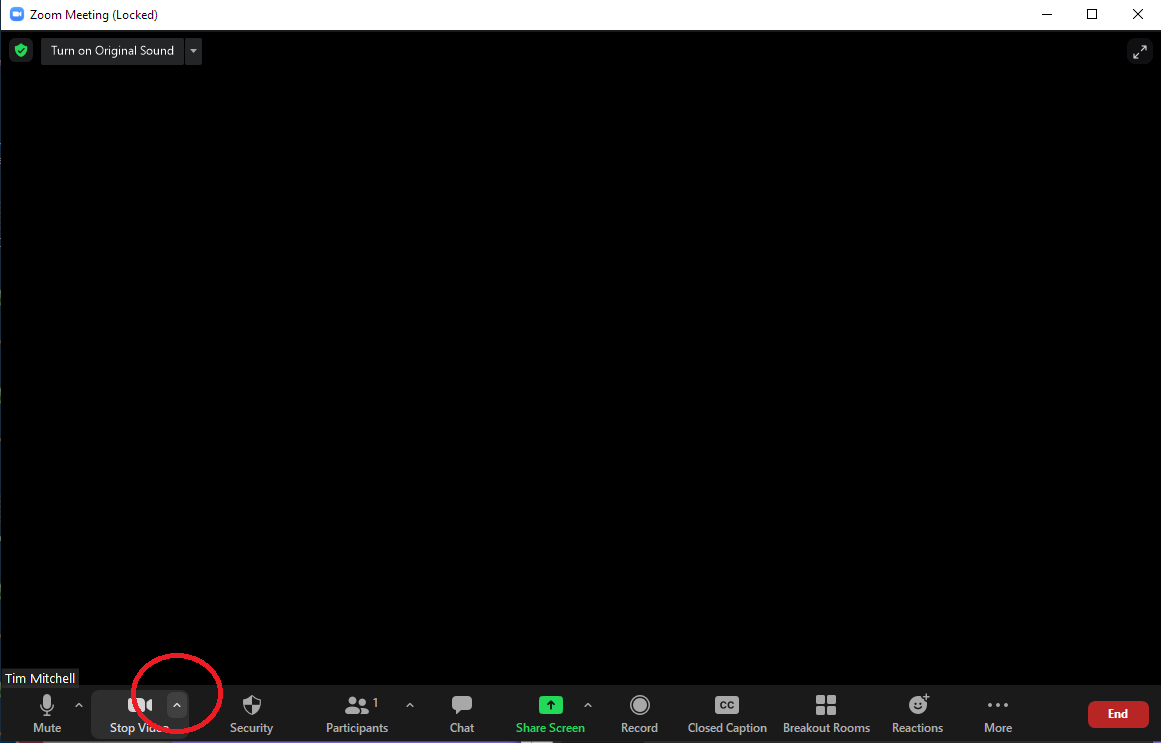
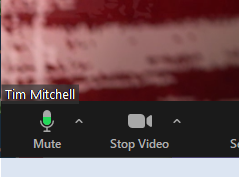
24. Now if you play back something on OBS, you should see the audio level change in the "Mute" button (like a little green bargraph). The tricky thing is that Zoom does not play you your own audio, so you will not hear the sound going out when you play a video - watching the Mute symbol tells you that it's working though.
There's a few settings on Zoom to make things work better.
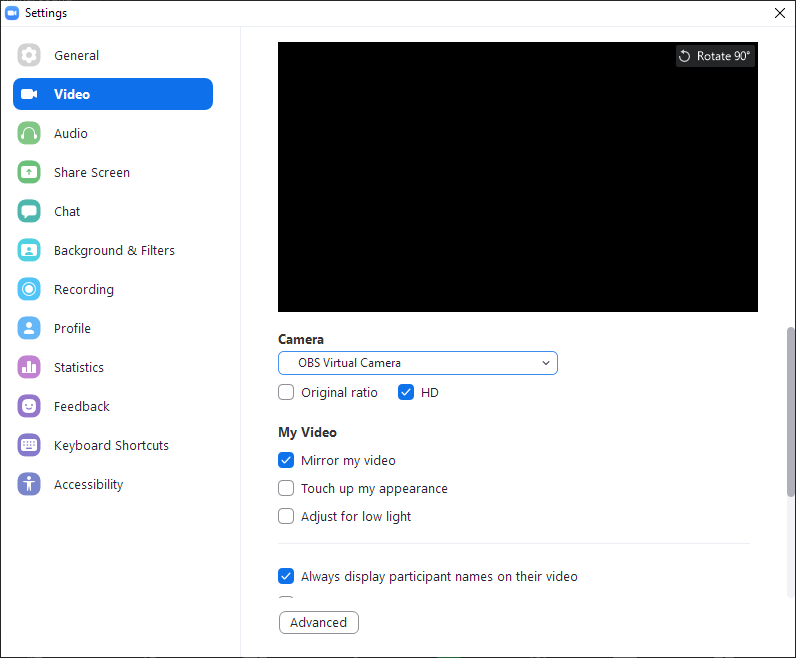
25. Click the Video source select button (Step 22) and select Video Settings. Ensure that HD is ticked and that "Adjust for Low Light" is not ticked. Also click on the "Advanced" button and make sure "Optimize video quality with de-noise" is not ticked.
26. While you are in the options, click on Audio on the left and set Microphone Volume to full.
Turn off "Automatically adjust microphone volume"
Set "Suppress background noise" to Low
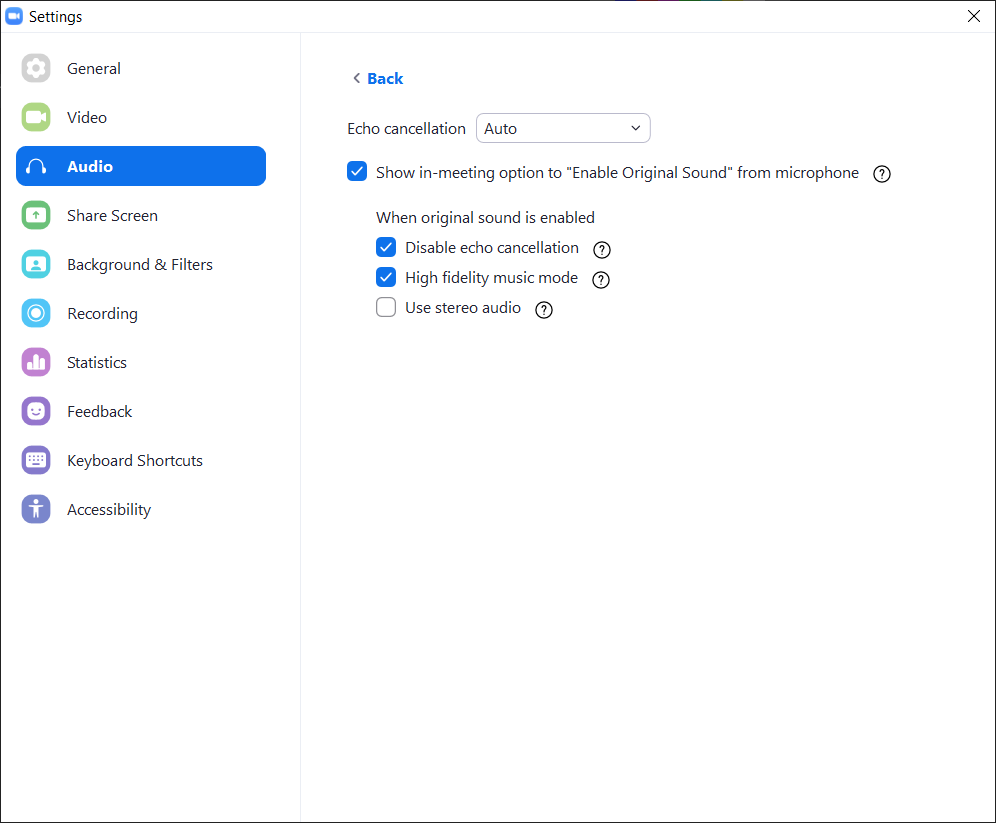
27. Click Advanced to set more Audio options. Tick the box "Show in meeting option to "Enable Original Sound" from microphone". Tick "Disable echo cancellation" and "High fidelity music mode"
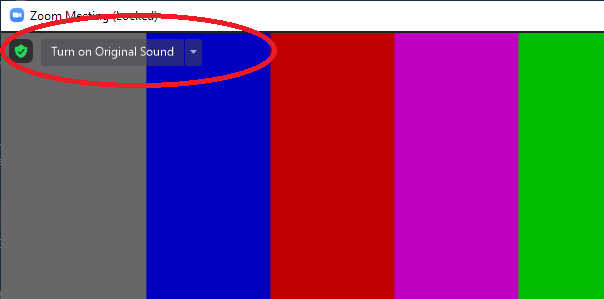
28. When you are playing back videos or music, click the "Turn On Original Sound" button on the top left of the main zoom screen (if you don't see this button you might have to enable it in your account options on the Zoom website).
If you are using your own webcam and mic, and you have the zoom call sound coming through speakers, you will cause echo on the call as your speaker sound gets back into your mic. To avoid this, disable Original Sound when using a mic, or leave the Echo Cancellation enabled, or use headphones to listen to the zoom meeting.
Other tips
Use the Zoom Spotlight function to lock the picture onto yourself when you're playing videos.
The sound works best if everyone else's mics are muted. The sound quality will get worse as more mics are open.
You can mute the sound of a video or other sound source by clicking the speaker icon on the OBS bargraph. You can adjust the sound level of a source using the slider to the left of the speaker icon.
Mute Desktop Audio to avoid getting Windows bongs on the meeting audio.
When adding more videos in OBS, copy the video source from another video (right click on source in the Sources list) and paste duplicate. Then edit the video file you want to play. This copies the Audio Monitor setting so you don't need to go in and change it.
You can overlay words onto a video source using OpenLP. This requires a custom stage making for OpenLP which will be the subject of another page...